Guest Edition

“I am Johannes and have been advising customers from various industries on the use of Dynamics 365 Customer Insights and Power Automate for several years. In the past, I have also worked as a web developer, which is often helpful in my current work. I am employed as a Project Lead Dynamics 365 Customer Insights at KC | KAISERSTADT CONSULTING GmbH & Co. KG in Aachen and mostly work from my hometown Berlin. I love the open exchange of knowledge in the IT world, have learned a lot from bloggers around the world in the past, and am happy to be able to give something back in this way.”
A small preliminary remark: This article has turned out longer than I initially planned. Nevertheless, I have decided to publish it as a whole, as I wanted to demonstrate the interplay of the different sub-areas. Whether I have succeeded in this, you decide 😊. Dynamics Customer Insights – Journeys has introduced many new and powerful features through the switch from the old Outbound Marketing module to the Realtime Marketing module. Trigger and trigger-based journeys are among my absolute favorites.
Because the trigger not only ensures the individual starting point of a journey but also provides us with context information, such as at a new event registration all information from the registration and the associated event. Thus, in emails that are sent in such a journey, we can access not only information about the recipient but also about the registration and the associated event. So, we can set up a journey that is permanently designed and runs completely automatically for all new events (or events filtered through conditions) from the moment of event registration until after the event. The potential time savings in event management are huge. Sounds too good to be true? Here I present my approach with some tricks and tips on how it can succeed.
Content of this article:
Preparing Emails: Getting the Most Out of Dynamic Text
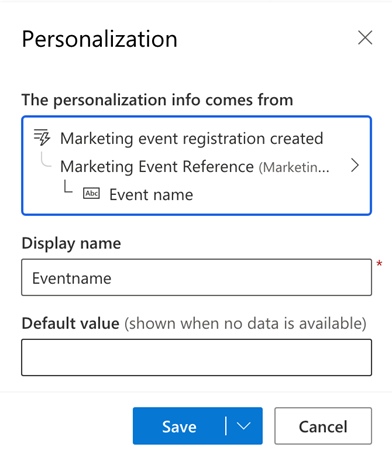
None of the journey emails should contain static content related to an event. To dynamically store information about the event in the email, we click on “Personalization” and then on “New dynamic text” and select the attribute “Marketing event registration created” under “Triggers”. There are three referenced data sets here, for us the first “reference for marketing event” is important in this case. Below you will find all the columns of the event record. Theoretically, we can go even deeper from here (for example, into the lookup dataset of the location) – up to five hops in total!
Dynamic event image: Individual look for our e-mails
We can also reference images from the library on the event. For example, there is the standard lookup column “Event Image”.
Note: We may need to add this column to the event form using the Power Apps Form Designer in order to use it.
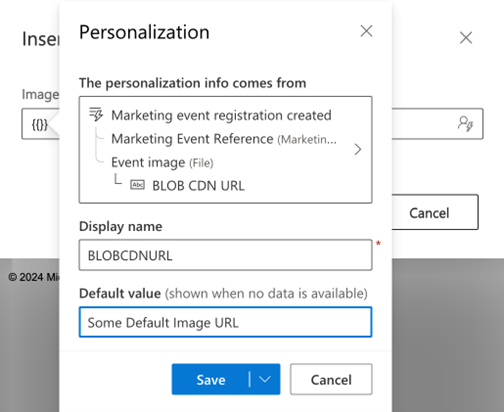
To get an image stored in the lookup “Event Image” into an email, we add a new image in the Email Editor and select “Add Image from URL” as the source. We then add dynamic text to the URL column and again select the referenced marketing event via the trigger. From here, we search for “event image” and click on the reference to get into the record. Event images, like all files in the library, belong to the table “files”. This table has multiple URL columns. It is important that our image uses the value on the “BLOB-CDN-URL” column, as this is the publicly accessible URL for our image.
Note: Be sure to set an image URL as the default value so that the email doesn’t look weird if no image is stored in an event.
Teams Participation Link: With a little HTML Magic
The simple variant would be to choose the link from the “Teams URL” column on the event as the participation link to the webinar. However, this approach falls short, because it means that we cannot use an extremely smart solution from Dynamics Customer Insights – Journeys: the automatic recording of check-ins.
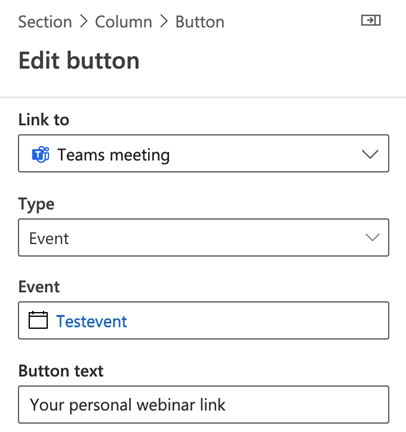
To use it, we need to work with the built-in “Teams meeting” function in the link configuration of the email editor (see screenshot). Unfortunately, you have to select a unique event in a lookup column, which is of course not ideal if the event is to be detected dynamically.
Nevertheless, we first choose this way to generate the basic link structure. From here, let’s continue in the HTML editor:
Understanding Link Structure and Purpose
First, let’s find the created link in the source code. Initially, the link (a <a> tag) has the following structure:
<a class="<<some styling classes>>"
href=https://public-eur.mkt.dynamics.com/api/v1.0/orgs/<<ID der Organization>>/eventmanagement/checkin/stream?eventRegistrationId={{event_registration_1}}&redirectUri=https%3A%2F%2Fteams.microsoft.com%2Fl%2Fmeetup-join%2F19%253ameeting_ZWQyNGZjMGItYTFiOS00ZmY1LWEwYTktMDFkMTQyMjljZDNh%2540thread.v2%2F0%3Fcontext%3D%257b%2522Tid%2522%253a%252207a4d75e-ef15-4ea1-9913-5ef5ffd3ce38%2522%252c%2522Oid%2522%253a%25226f6b301a-522e-48ab-aa38-b5665320b93c%2522%257d#_msdynmkt_donottrack=0
style="<<some styling information>>"
data-msdyn-tracking-id="<<some tracking ID>>"
data-lookup-name="TestEreignis Checkin 1"
data-lookup-id="2a7e752f-2af2-4802-8a03-b26a5f6e9e4c"
data-lookup-type="msevtmgt_event">Your personal webinar link
</a> Even though this may seem a bit daunting, <a>-tags in HTML (like other elements) are very clearly structured. You can add as many attributes with corresponding values as you like. One such attribute is the “style” attribute, which can provide the element with styling information. The “href” attribute contains the destination of the link. Here, we see that the link’s target is not directly the Teams URL, but initially the URL https://public-eur.mkt.dynamics.com/ with a lot of additional information. I won’t go into too much detail here, but in plain terms, this means that a request is sent to this API hosted by Microsoft. The API there checks the information and then sends an order to our Dynamics (which is defined via the Org. ID) to create a check-in for the associated participant. Subsequently, the API redirects to the actual Teams event. To make the request truly dynamic, we now need to replace all the red-highlighted parts with dynamic elements. Fortunately, we can easily insert dynamic text in both the normal editor and in the source code.
Creating Dynamic Text
Normally, it’s enough to simply insert dynamic text in the form of {{dynamic_text}} into the running text; the editor immediately recognizes this placeholder and shows a new, incomplete data source in the right-hand area under “Personalize”. You can then click on this data source and set the desired source.

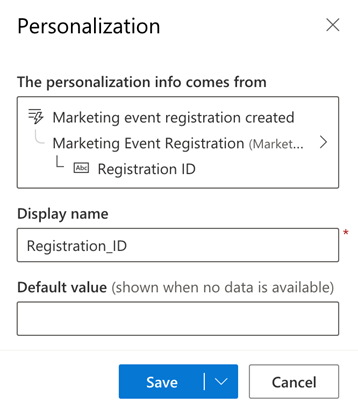
If you looked closely earlier, you could already see a predefined placeholder {{event_registration_1}} in the HTML code of the Teams participation link. This is created by the system and certain exceptions apply to it, so it does not appear in the “Personalize” section in the right window area. Since we are manipulating the link structure, this placeholder does not work correctly either, which is why we will replace it with our own {{Registration_ID}}.
Furthermore, placeholders that do not appear in the text of the email (but for example only as attributes of HTML tags) are not recognized by the editor. Since we certainly want to avoid placing the event ID or the registration ID visibly in the text, we can do the following:
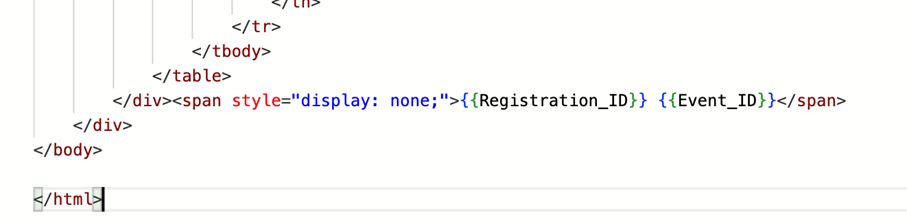
At the end of the email in the HTML editor, between the penultimate closing </div> element and the last closing </div> element, we add a new <span> element along with the styling attribute “display: none;”. We can place the required placeholders there. In this way, the email editor recognizes the placeholders, and they are still invisible to the recipient.
So, let’s now edit the link at the necessary places and add the aforementioned <span> element in the body of the email. After editing, the link looks like this:
<a class="<<some styling classes>>"
href=https://public-eur.mkt.dynamics.com/api/v1.0/orgs/<<ID der Organization>>/eventmanagement/checkin/stream?eventRegistrationId={{Registration_ID}}&redirectUri={{Teams_URL}}#_msdynmkt_donottrack=0
style="<<some styling information>>;"
data-msdyn-tracking-id="<<some tracking ID>>"
data-lookup-name="{{Eventname}}"
data-lookup-id="{{Event_ID}}"
data-lookup-type="msevtmgt_event">Your personal webinar link
</a> Note: The “data-msdyn-tracking-id” attribute contains a unique ID through which behavioral data can be captured and assigned. So, when a link is clicked, this ID records which link it is and who clicked it. For my purposes, I did not change this ID and used the default value.
After these adjustments, the HTML editor can be closed. Now we can set the data sources for all newly recognized and so far incomplete placeholders in the “Personalize” section as follows:
Data Sources of the Placeholder Texts
The following placeholder texts are needed to make the link dynamic:
- {{Registration_ID}}: This is the value from the “Registration ID” column on the event registration (Schema name: msevtmgt_name).
- {{Teams-URL}}: This is a URL-encoded form of the Teams link stored in the event in the “Teams URL” column (msevtmgt_attendeeurl). In my tests, there were no problems using the URL without encoding it first; I could directly use the value from the column.
- {{Eventname}}: We use the value from the “Event Name” column (msevtmgt_name).
- {{Event_ID}}: This is the system ID of the event (msevtmgt_eventid).
Important: For all the references mentioned here, we use the dynamic content described above via the “Marketing event registration created” trigger.
Calendar Icon Download
Often, a calendar entry is also offered for download. This link must also be connected in the Email Editor via a lookup column with a unique event data record. However, it is possible to modify the link in a very similar way as we have already done with the Teams participation link.
<a href="https://public-eur.mkt.dynamics.com/api/v1.0/orgs/<<your organziation ID>>/eventmanagement/calendar/personal/ics?data=[{"eId":"{{readable_event_id}}","d":{"er":"{{Registration_ID}}","type":"2"}}]#_msdynmkt_donottrack=0"
data-lookup-name="{{Eventname}}"
data-lookup-id="{{Event_ID}}"
data-lookup-type="only_event">Add to calendar
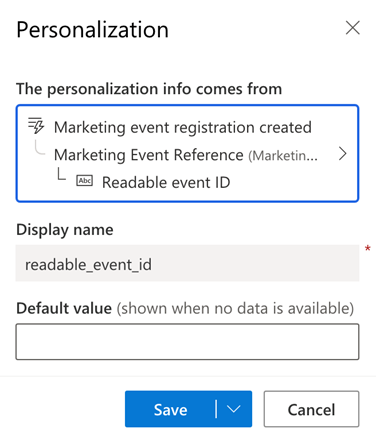
</a> The only new placeholder here is {{readable_event_id}}, which is the value from the “Readable Event ID” (msevtmgt_readableeventid) column of the event record. We have already generated the other placeholders through the Teams participation link and can reuse them here.
Other Options
There are countless ways to further personalize the emails regarding the event or registration. Custom columns can also be utilized.
For example, it is conceivable that each event has its own download area for materials or individual surveys are sent for events. Corresponding access links could be stored in their own columns on the event and then referenced in the email.
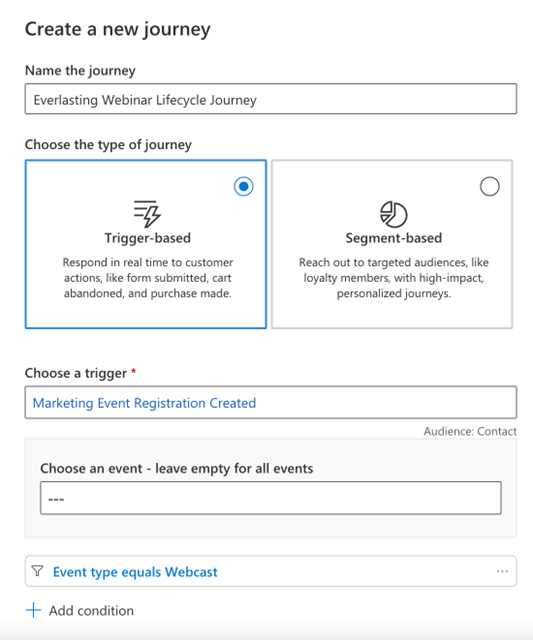
Creating the Journey
When creating a new journey, we can choose between classic segment-based and so-called trigger-based journeys. For our scenario, we need a trigger-based journey, which we initiate with the out-of-the-box (OOB) trigger “Marketing Event Registration Created”.
Filter for the Trigger
Optionally, we can set a filter to prevent the journey from starting with all event registrations. Since we have targeted the emails to webinars, it might make sense to target a filter to the “Webcast” event type (or a custom type). However, we must also ensure that the event type is always maintained correctly.
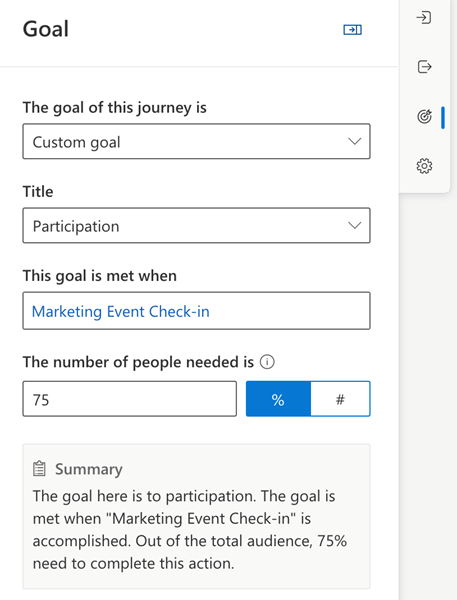
Goal Settings
To later evaluate the journey, we can define the goal of “participation” in the Goals section, for instance. For this purpose, the also out-of-the-box “Marketing Event Check-In” trigger can be stored.
Note: Since we are building a cross-event journey, evaluation at this point can only be cross-event as well. This also means that if multiple concurrent (i.e., still active and uncompleted) runs of the journey of the same contact occur, a new check-in for any event would be related to all open runs, regardless of which event the check-in was created for.
No Emails to Cancelled Registrations
In the event of a cancellation for a contact, the journey should be stopped. The first impulse might be to achieve this with an exclusion trigger (“Exit when a trigger occurs”). However, this presents us with a challenge because, just like the check-in trigger described above, if the “Marketing Event Registration Canceled” trigger was activated, all active instances of the journey with the same contact would be stopped. This means that this approach can only be chosen if the journeys of two webinars will never overlap in time.
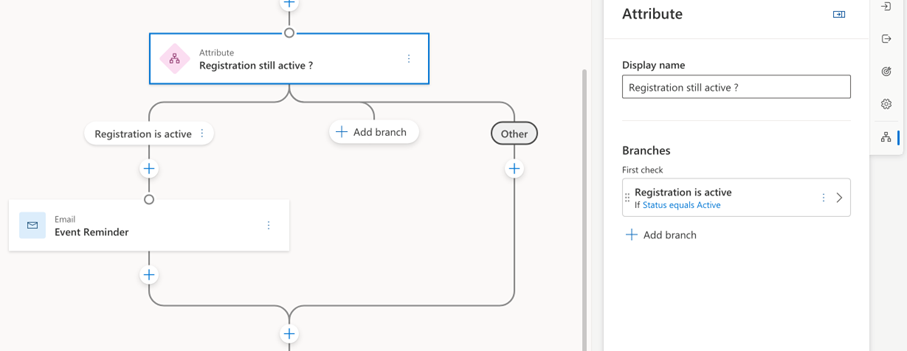
My approach to solving this problem is to frame all relevant steps in the journey with an attribute branch and each time check if the status of the event registration is still active. If this is not the case (because the event registration has been deactivated or deleted), then the email dispatch is simply skipped. Technically, this means that all instances of the journey will always remain open until the end and are not prematurely terminated. In practice, however, this approach leads to the desired behavior that no more emails are sent from the time of a cancellation.
Sending a Reminder One Day Before the Start of the Event
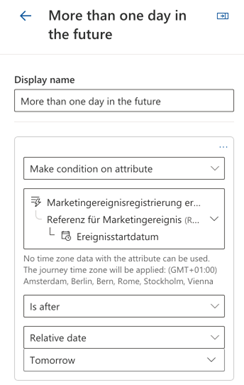
In our case, after initially sending a registration confirmation, a reminder with the access data should be sent one day before the event. However, if the registration itself is carried out less than one day before the start of the event, a reminder would be superfluous and should not be sent. To achieve this, we can use an attribute branch to check if the event is more than one day in the future.
The somewhat bulky configuration for the branch is “Event Start Date – Is After – Relative Date – Tomorrow”. Simply put, this means that at the time the contact is at that point in the journey, the event start date is further in the future than one day.
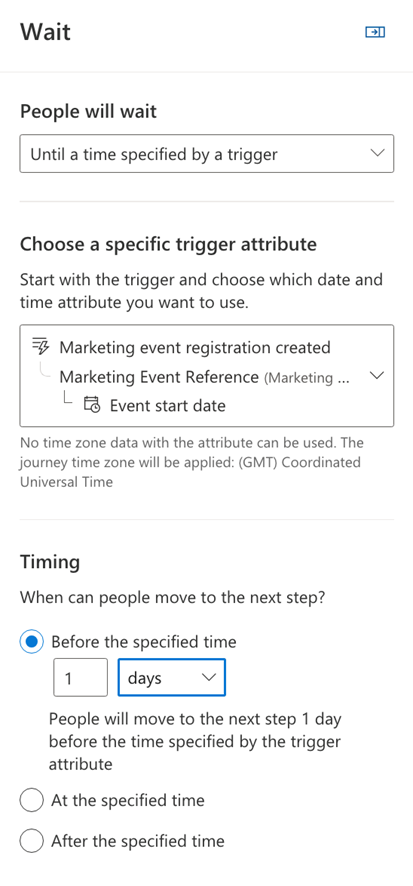
In the “Yes” branch of the branch, we now create a waiting condition until exactly one day before the event starts, to send the reminder then.
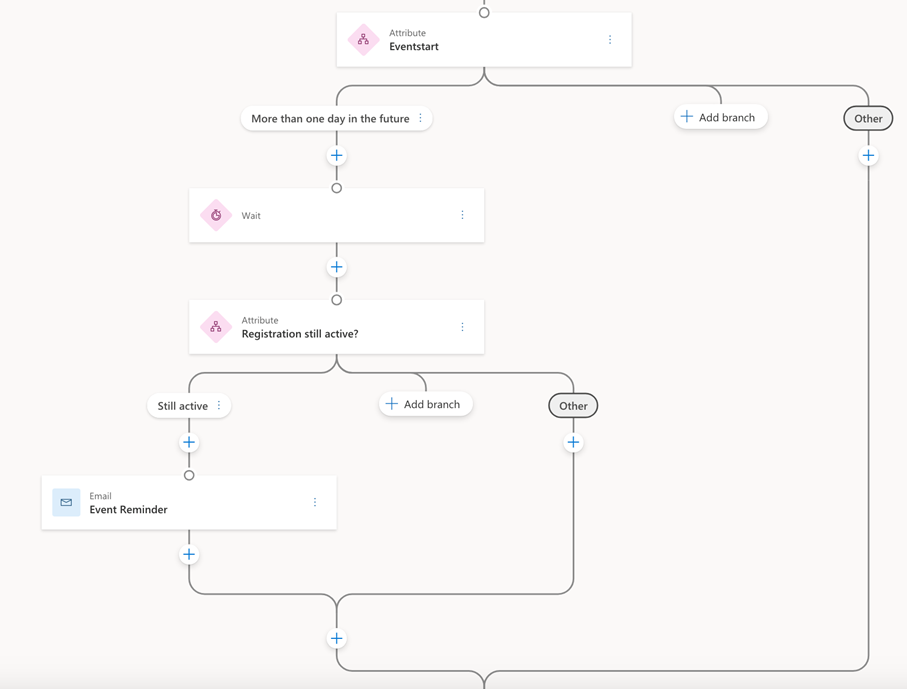
The whole part for sending a reminder email (including checking the registration status) then looks like this:
Responding to Check-In
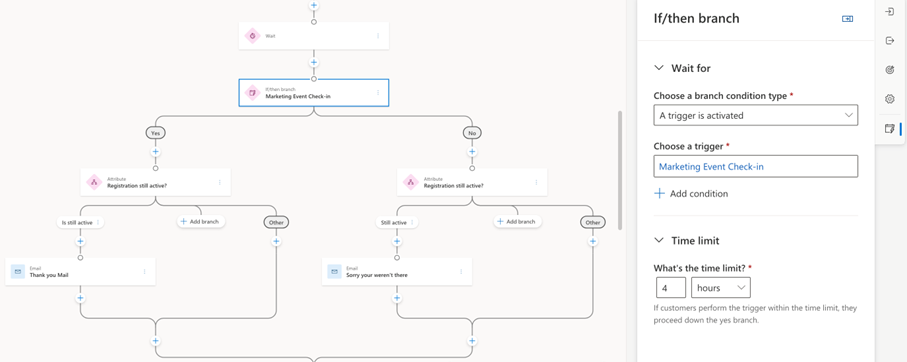
When the event takes place, we want to respond to check-in events. Remember, a check-in is created the moment a contact clicks on the personal Teams participation link. To do this, we create another waiting condition relative to the event start date. For example, we choose 30 minutes before the specified time.
Then we start waiting for the check-in event. For this, we add a “Wait for Trigger” action and select the “Marketing Event Check-In” trigger. A static time limit must be set. This should be based on the usual length of our webinars, as it unfortunately cannot be changed per event. In my case, I’ve set a value of 4 hours here. In plain terms, this means that the journey at this point (i.e., from 30 minutes before the start of the event) waits a total of 4 hours for a check-in of the contact. If the check-in occurs before or after this period (e.g., as part of another event), the check-in will be ignored. If the check-in occurs during the four-hour waiting period, the journey will immediately continue in the “Yes” branch. If there is no check-in during the entire four hours, the journey goes to the “No” branch after the 4 hours have elapsed.
Afterwards, we can add a waiting condition in the “Yes” and “No” branches until the end of the event and then send a thank-you email or, in case of non-participation, send a questionnaire or note about other seminars.
In the rather unlikely event that the same contact signs up for two overlapping events, we reach technical limits here. This is because if this contact now checks in for one of the two events, while the journey instance for the other event is also waiting for a check-in event, then this instance would also react to this and send the contact to the “Yes” branch accordingly. I think this circumstance is justifiable, as the situation should very rarely if ever arise that a physical person wants to participate in two webinars taking place in parallel.
More Ways to Work with Tasks in Dynamics365
Depending on whether participation or non-participation in the event is relevant to sales, in one case or the other (or both), a task could be created that is assigned to the corresponding lead or contact.
In principle, we can create tasks directly in the journey through our own action. However, we are limited in terms of content because we cannot insert dynamic text (such as the name of the event) in this way.
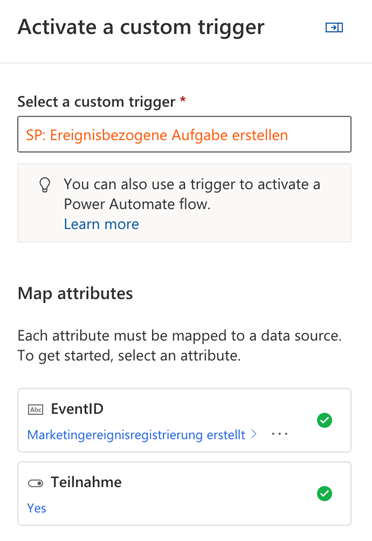
If this is necessary, this would be a perfect use case for a custom trigger to which we can add any number of attributes (such as the ID or the name of the event). We could then use this trigger as a starting point for a flow that processes the given attributes and then creates the task with corresponding dynamic content. But this is a separate topic for a future blog post.
Concluding Remark
Of course, the journey definition presented here is only one way of what such an event lifecycle can look like. The process can be adapted or expanded according to the usual processes in the company. However, with the logics and tools presented here, it should be possible to map many different scenarios without having to write a single line of code.
In this approach, it was important to me to find a way to really exhaust the onboard resources of Dynamics Customer Insights – Journeys and to do without adding my own code. This method is therefore suitable for all users, regardless of whether they have developer knowledge or not. In very rare scenarios, this approach could lead to unintended behavior (for example, when events overlap in time).
A possible approach with the use of your own code or flows to avoid these risks could be to establish a connection between the instance of the journey and the associated event registration, and then react to changes to the event registration with your own algorithms to then stop the associated instance of the journey or to capture the check-in events, when appropriate triggers are triggered.
This is my first post in this form. I welcome comments, tips or questions in the comments.
Johannes Fleischhut, Project Lead Dynamics 365 Customer Insights, KC | KAISERSTADT CONSULTING GmbH & Co. KG
***Please be aware: The content is accurate at the time of creation. It may be that Microsoft has made changes in the meantime.***
Hello Johannes,
thank you for your well written blog post and the input. I have set up a similar event journey, but had issues with different time zones. While the wait block uses the time zone of the journey, the check in trigger uses UTC so checkins are potentionally not taken into account. Is there a way to handle that when using the out of the box triggers?
Best, Martin
Hello Martin,
Thank you for this interesting question. I looked into it myself with a few tests and was able to reproduce the problem. The waiting condition in a contact history apparently cannot process the time zone setting of an event. In my case, the note for the corresponding setting therefore reads “No time zone data with the attribute can be used. The journey time zone will be applied: (GMT+01:00) Amsterdam, Berlin, Bern, Rome, Stockholm, Vienna”. In fact, the start date of an event in the “msevtmgt_eventstartdate” field is apparently always saved as a GMT timestamp (in the form 2024-01-23T09:00:00Z), but not in relation to the actual time zone specified, but simply always as the value entered. The time zone in the event is only taken into account by the combination of this field and the field “msevtmgt_eventtimezone”. However, we cannot bring this combination into the wait condition in a journey as described above.
I think what we can do is always make sure that the timezone of the event matches the timezone of the journey. In this case, the wait condition should wait until the right time.
Best
Johannes