· Pauline · How-to · 7 min read
I Heard It Through the App Vine: Send in-app notifications via Journeys
Learn how to create a reusable trigger and Power Automate flow to send in-app notifications to the right users directly in Dynamics 365 Customer Insights Journeys.

Please be aware: The content is accurate at the time of creation. It may be that Microsoft has made changes in the meantime.
Let’s stay with triggers for a while. A few weeks ago, I showed you in a video how to use triggers in Journeys to send Teams notifications. You don’t necessarily have to leave the system to do this. There are also in-app notifications in Dynamics 365 Customer Insights and I have built a new trigger that you can use in all journeys to notify the right users.
By the way: Did you know that the version of the song ‘I heard it through the grapevine’ by Marvin Gaye (1968) was inducted into the Grammy Hall of Fame for ‘historical, artistic and significant’ value? And the Rolling Stone list even ranked it 119th among the 500 best songs of all time.
What can the in-app notifications in Customer Insights Journeys do?
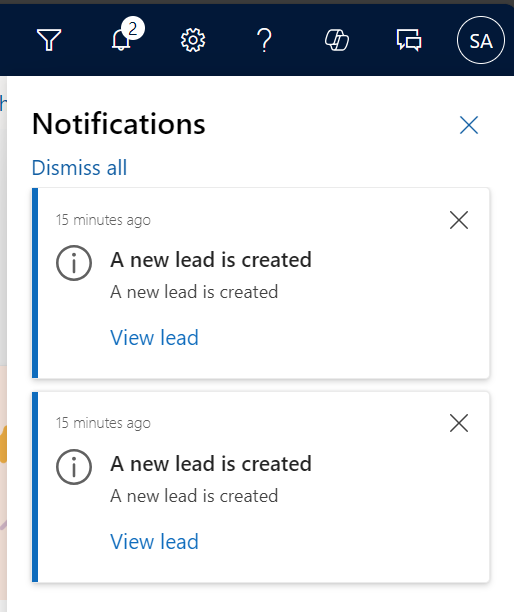
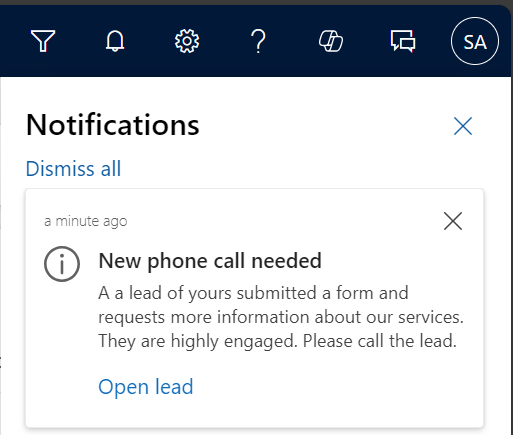
In-app notifications are a nice little function in the model-driven apps that I haven’t used that often myself. But I find it super charming. In the app, the little bell icon shows the notifications, just like when you have unread messages in Messenger on your mobile phone. It’s informative, but not intrusive.
Temporary notifications, so-called toast notifications, appear on the right-hand side of the application like small pop-ups. If you receive several notifications, they are stacked. If the number of notifications exceeds three, you get an additional notification. You can then also see these notifications by pressing F2. Users can also switch off these toasts. In the notification settings, you can switch off the toast notifications or you can define how long they should be displayed until they disappear automatically.
It is also important to know that the notifications are user-specific. Recipients can only ever be users and not teams.
Show in-app notifications in the app
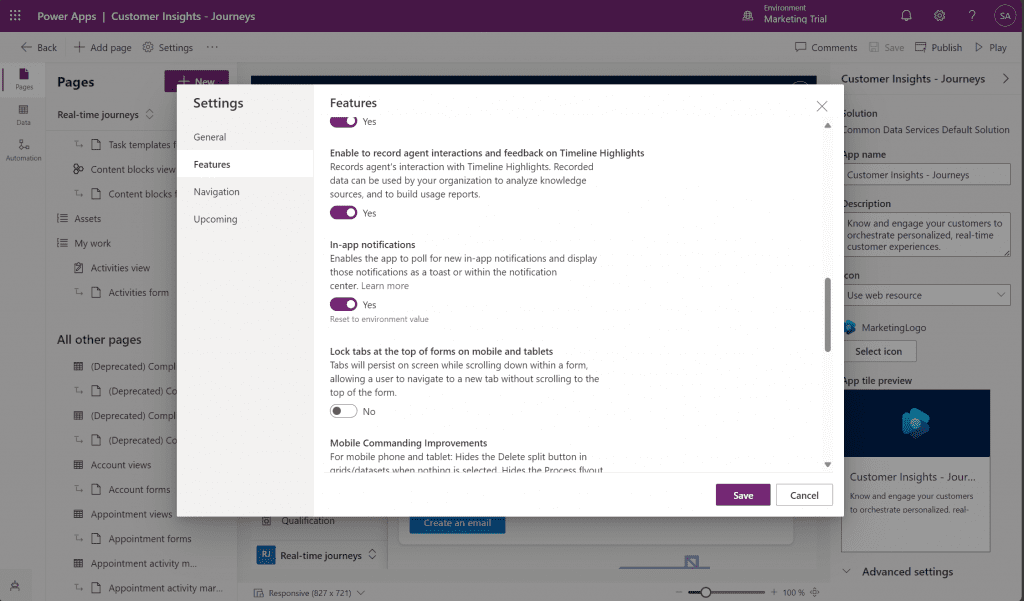
In order for the small bell to show up in the app at all, you must first switch on the feature in the respective app. To do this, open the app in a solution in the Power Apps portal (make.powerapps.com) and click on the Settings button. There you will find a toggle for the in-app notifications. Don’t forget to save and publish, of course.
Send in-app notifications in Customer Insights Journeys
As you may know, I’m a bit of a fan of triggers. Especially triggers that can be easily reused by users. So we are going to create an in-app notification trigger in Customer Insights Journeys that you can use for different purposes. We build it dynamically so that the user can decide the content of the notifications themselves - depending on the use case.
Create trigger
My trigger runs for the context Leads. The trigger also needs a few attributes that we will fill dynamically later via the journey. I create the following attributes, all with the type Text: Body, Owner, Priority, Title, Link Text.

Create Power Automate
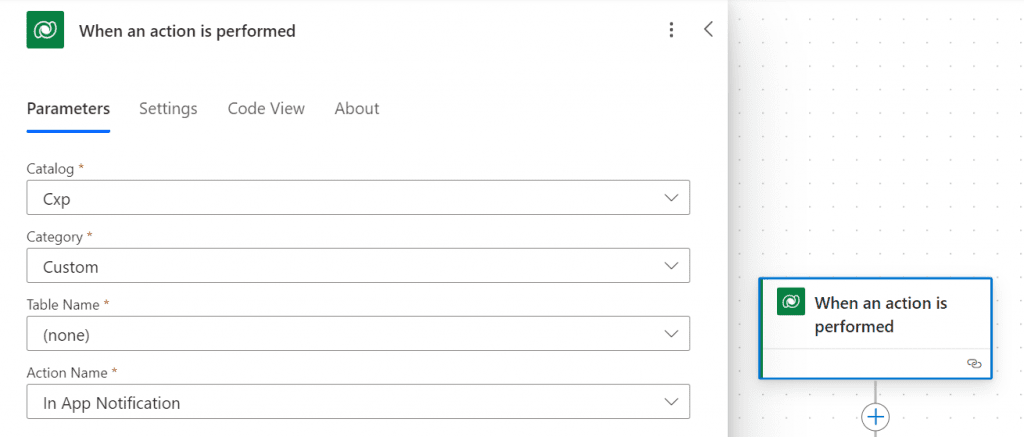
Next, I create the Power Automate Flow which starts by the journey. The flow starts with the trigger ‘When an action is performed’ and I fill the parameters with the values from the screenshot. For Action Name, I select the trigger I just created.
In the next step, I use the switch action. This allows me to send notifications with different priorities. I have also added priority as one of my attributes in the trigger and if this is filled with High or Normal, I can also adjust the notification accordingly.
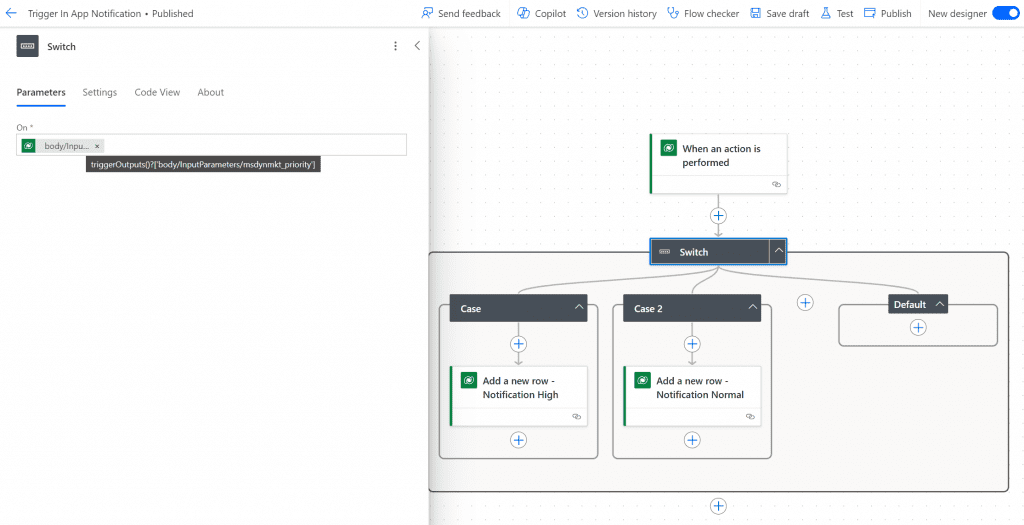
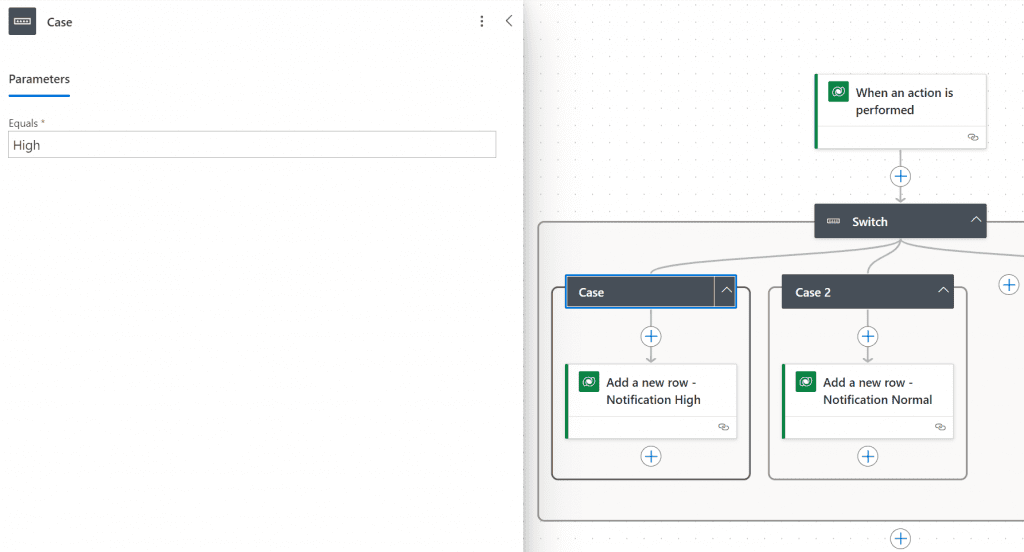
I create a separate step for each switch path to create the notification. It is best to create one first and then copy it. This is quicker and only minor changes need to be made.
The step that creates the notifications is Add new row. Notifications are a separate table. Then I fill the parameters with the dynamic attributes of the trigger.
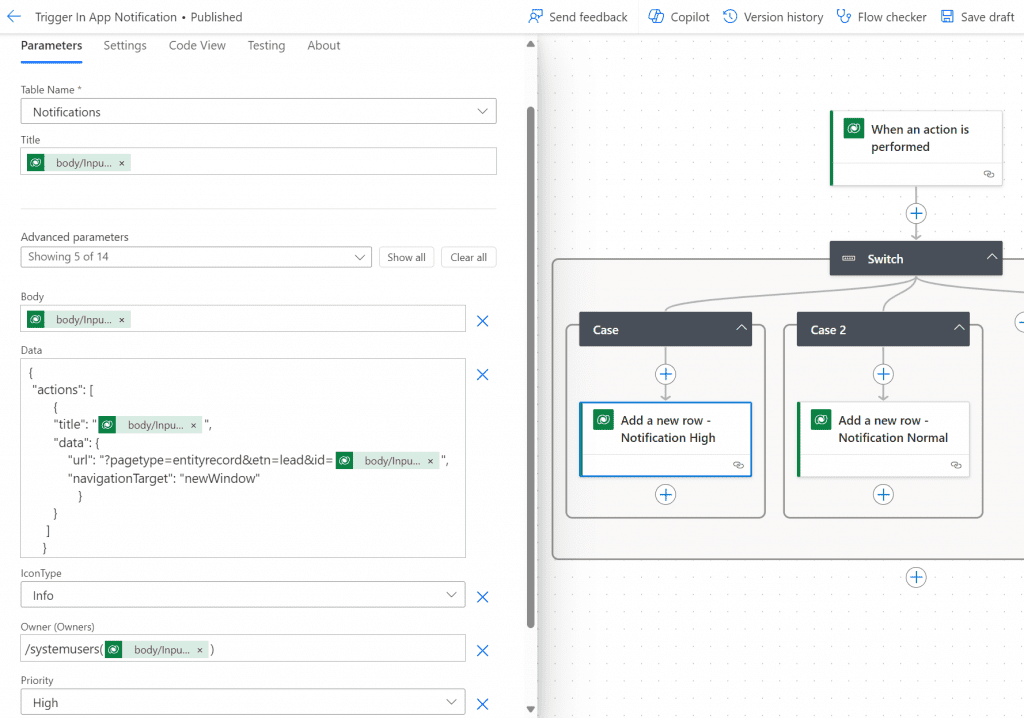
You can find the details for the parameters in the table below:
| Name | Value in Power Automate | Description |
|---|---|---|
| Title | @{triggerOutputs()?[‘body/InputParameters/msdynmkt_title’]} | Title of the notification |
| Body | @{triggerOutputs()?[‘body/InputParameters/msdynmkt_body’]} | Details of the notification |
| Owner | @{triggerOutputs()?[‘body/InputParameters/msdynmkt_owner’]} | Users who should receive the notification. Here it is the owner of the lead |
| Data | Here we insert a JSON, which I will explain in the next chapter | JSON, we use for the extensibility of the notification. The maximum length is 5,000 characters. |
| Priority | triggerOutputs()?[‘body/InputParameters/msdynmkt_priority’] | Enables the prioritisation of notifications, which determines the order in which the notifications are displayed. |
There are other parameters for notifications that you can define if required. With Toast Type, you enter whether there should be a pop-up or whether the notification should not appear separately on the screen. Expiry describes the number of seconds after which the notification should be deleted if the user has not already canceled it. Under* Icon Type*, you can choose from a set of icons for the notification, but you can also create your own icons.

Extend notification with JSON
We can now insert a JSON in the Data parameter. It extends the notification with further information like links. I also add the attributes from the trigger to this code in order to format the link text and the link to the lead as individually as possible.
{
  "actions": [
        {
        "title": "@{triggerOutputs()?['body/InputParameters/msdynmkt_linktext']}",
        "data": {
            "url": "?pagetype=entityrecord&etn=lead&id=@{triggerOutputs()?['body/InputParameters/msdynmkt_profileid']}",
            "navigationTarget": "dialog"
               }
        }
      ]
     }
The code also contains a detail called navigationTarget. This parameter controls how to open the navigation link. The options are dialogue (opens in the central dialogue), inline (opens in the current page), newWindow (opens in a new browser tab).
Create journey with in-app notifications
In the last step, we create the journey. Of course, you can design it however you like. After all, you can use the trigger at any point.
In my case, my lead who submits a form receives an initial informative email and a follow-up two days later. If he clicks on the ‘Contact’ button there, we create a phone call first and then notify the lead owner. Overall, my journey looks like this:
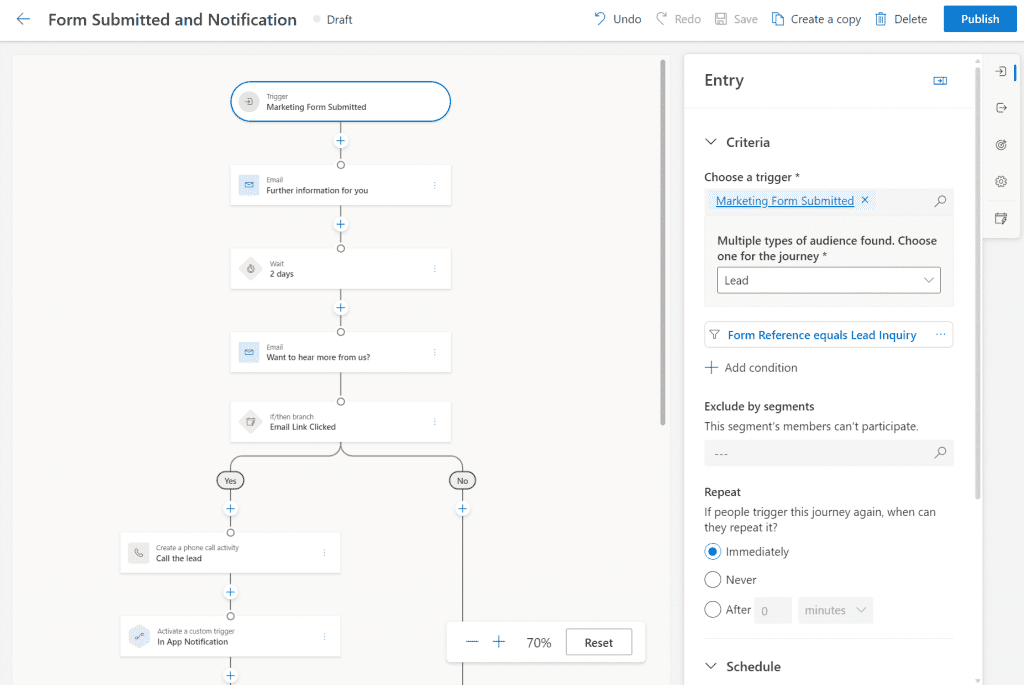
It is important to fill all attributes of my trigger. In most cases, I use the values and fill in the free text field with the text that the notification displays later in the notification. Only the receiving user is dynamic, namely the owner of the lead. In the journey, the settings for the lead look like this:
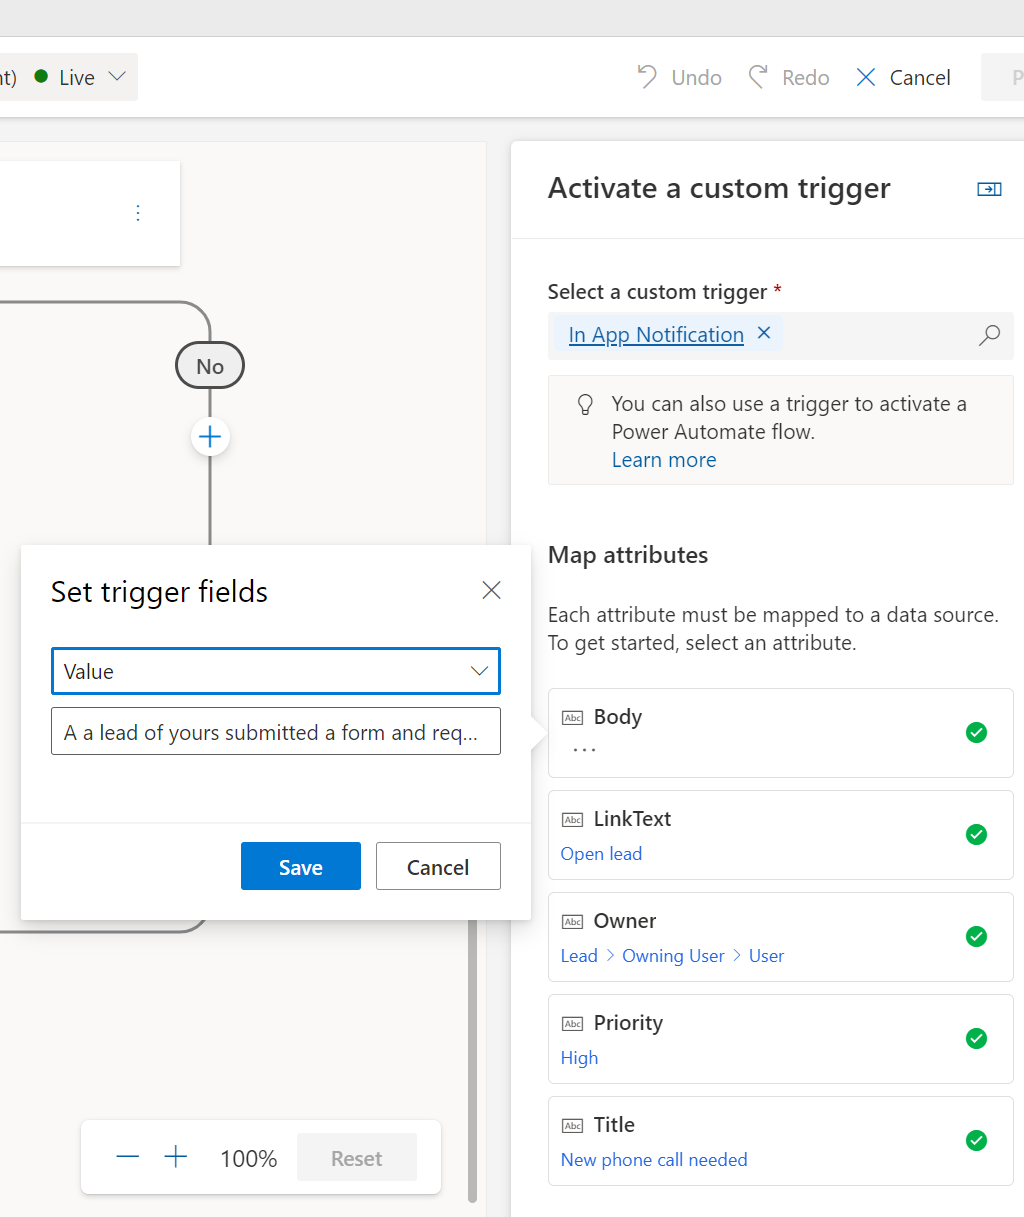
So as soon as someone walks through the journey, the Power Automate starts and triggers the notification.
An important note: I already mentioned that the notifications are a separate table. This means that every data record also requires storage space. It is therefore important to consider the volume of notifications sent and also to take care of the settings, e.g. regular deletion requests.
Summary
I often have the request that sales employees should receive a notification when there is a new lead, when someone submits a form, a lead takes part in an event or whatever. With the triggers, we are able to implement this for Teams messages or in-app notifications. And other channels such as emails work in the same way in principle.
What have you already used in-app notifications in Customer Insights Journeys for and what are your experiences?
References: 500 Best Songs of All Time (rollingstone.com), SendAppNotification Action (Microsoft.Dynamics.CRM) | Microsoft Learn, Send in-app notifications within model-driven apps - Power Apps | Microsoft Learn
Do you have questions, ideas or remarks? Feel free to get in touch.


