· Pauline · How-to · 9 min read
How to Approve Event Registrations with Multistage Approvals in Dynamics 365
Learn how to handle event registrations in Dynamics 365 with multistage approvals using Agent Flows, combining AI, human review, and status handling for a smooth attendee experience.

Please be aware: The content is accurate at the time of creation. It may be that Microsoft has made changes in the meantime.
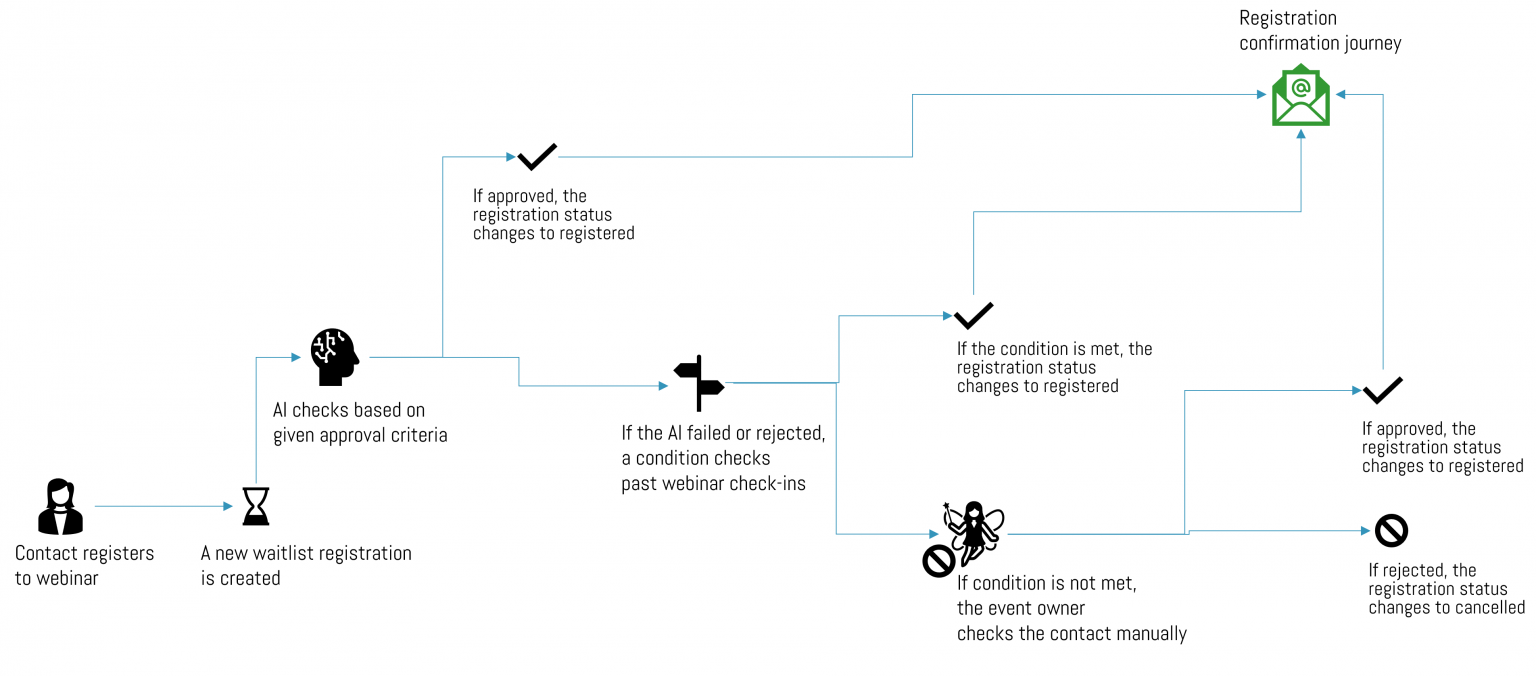
At this year’s Nordic Summit, I prepared a demo to show how you can manage event registrations in Customer Insights Journeys using the new multistage approval in Agent Flows.
Scenario: Goals for Managing Event Registrations
Here’s what I wanted to achieve:
- Everyone who submits the event registration form should be waitlisted first.
- As an event manager, I only want known contacts and customers to participate.
- Once the registration is approved, the process should continue and send the confirmation email.
- If the registration is rejected (e.g., because the contact is from a competitor), the system should cancel the registration.
- As an event manager I am busy, so I want AI to help me but still have a human in the loop.
Why Not Just Use the Standard Waitlist?
Good question! Normally, you can set the Maximum event capacity to 0. This automatically puts all registrants on the waitlist, and even updates the button on the form to say “Join the waitlist.”
But here’s the tricky part:
- To register someone from the waitlist, you first need to increase the maximum event capacity.
- Then you manually set the person’s status to “registered.”
- During that time, someone else could slip in and register directly.
It works, but it can get a little confusing. Hopefully I explained it in a clear way here.
Note Before We Dive In (Feature Is in Preview)
In this article, I’ll show you the approach with Agent Flows. Oh, and this feature is still in preview!
Customize the Event and Registration Tables (Prerequisites)
Step 1: Add custom fields to your event
For this scenario, we’ll add two new fields to the event:
- Approval process needed? (Yes / No) → This ensures the approval logic only runs for events where it’s required.
- Set event capacity (Whole number) → This defines the actual event capacity, since the default field “Maximum event capacity” will be set to 0 by default.
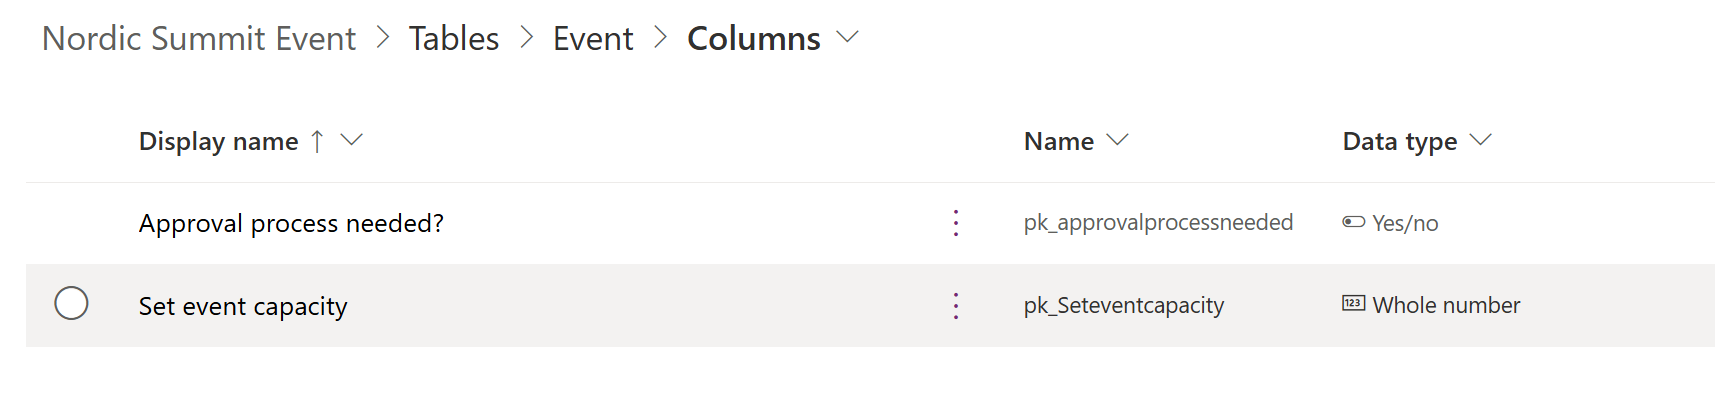
Don’t forget: add both fields to the event form.
Step 2: Create a business rule
Next, we’ll create a business rule to simplify the setup:
- When Approval process needed = Yes, the rule will hide and preset the default fields used for the waitlist process.
- This avoids confusion for event managers and prevents accidental manual changes.
Here’s an example of my business rule in text view. Feel free to adapt it to your own needs. The critical part is that the field “Maximum event capacity” must be set to 0 and the “Waitlist this event” to Yes.
IF
Approval process needed? equals "Yes"
THEN
Show field Set event capacity
Set Set event capacity as Business Required
Hide field Maximum event capacity
Hide field Waitlist this event
Set default value of Maximum event capacity to 0
Set Waitlist this event to "Yes"
ELSE
Hide field Set event capacity
Set Set event capacity as Not Business Required
Show field Maximum event capacity
Show field Waitlist this event
Step 3: Adjust the event registration table
Now let’s move to the Event Registration table and make two adjustments:
Update the “Status reason” field
- For the Inactive status, add a new value called “Rejected.” This will allow us to clearly distinguish between cancelled and rejected registrations later in the process.
Create a formula field
- This field will pull in the value from our “Approval process needed?” field on the event. We’ll need this information later to configure the trigger in our flow.

Here’s the formula I used:
$"{{
""approval"":""{Event.'Approval process needed?'}""
}}"
Create the Approval Flow (Agent Flow or Power Automate)
As mentioned before, you can choose between a “normal” Power Automate flow or an Agent Flow. If you’d like to experiment with AI in your approval process, go with an Agent Flow created in Copilot Studio.
1. Trigger: Event Registration table
- Start the flow with “When a row is added, modified or deleted” for the Event Registration table.
- Add a trigger condition in the settings of the trigger so the flow only runs when Approval process needed = Yes.
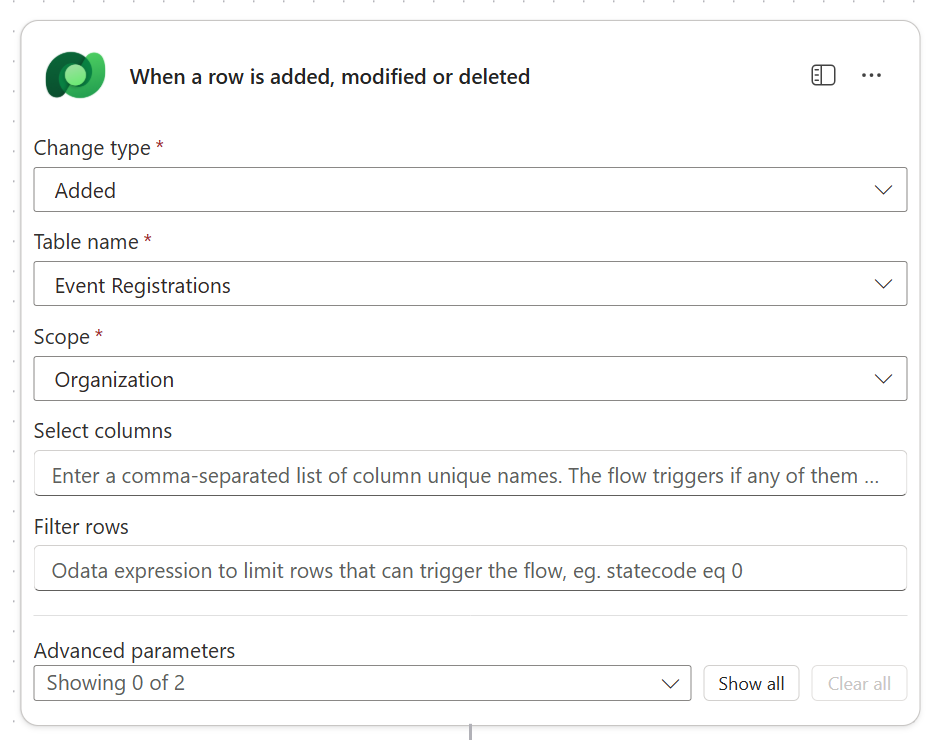
Since this field sits on the event (not directly on the registration), you could add a condition after the trigger. But that would start the flow for all registrations, which is inefficient. We can use our formula field directly in the trigger condition:
@equals(json(triggerOutputs()?[‘body/pk_eventdata’])?[‘approval’],’1′)Optional: You can add another condition so the flow only runs if the Status Reason = Waitlisted.
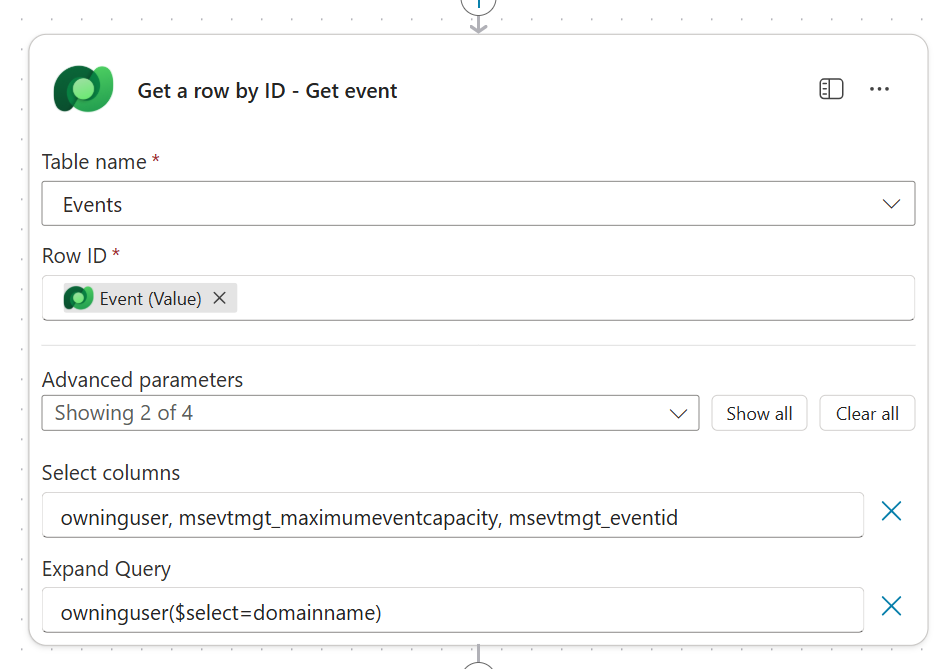
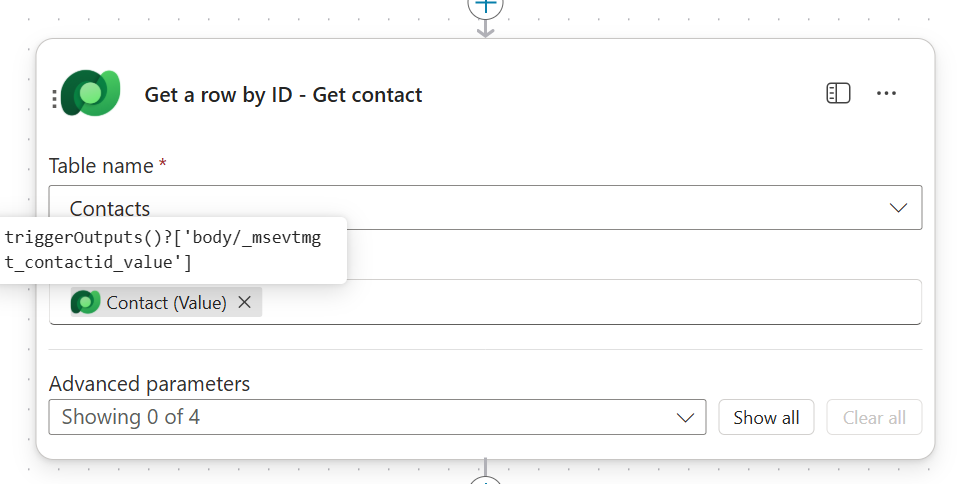
2. Get event & contact data
Get event record → columns needed:
owninguser,msevtmgt_maximumeventcapacity,msevtmgt_eventid.- Expand query with
owninguser($select=domainname)→ this lets us send approval to the event owner later.
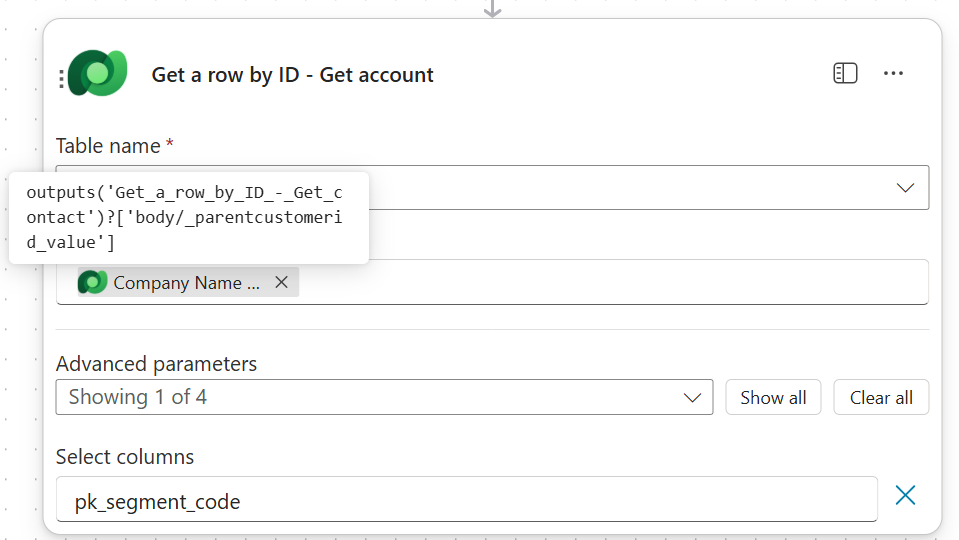
- Expand query with
Get contact record and get contacts parent account record → I need the account record to check the segment of the account (custom field). If the account is in the Gold segment, they should be approved right away. Feel free to skip if you use different criteria.
- Check past event participation → add a List rows action on the Check-ins table for that contact.
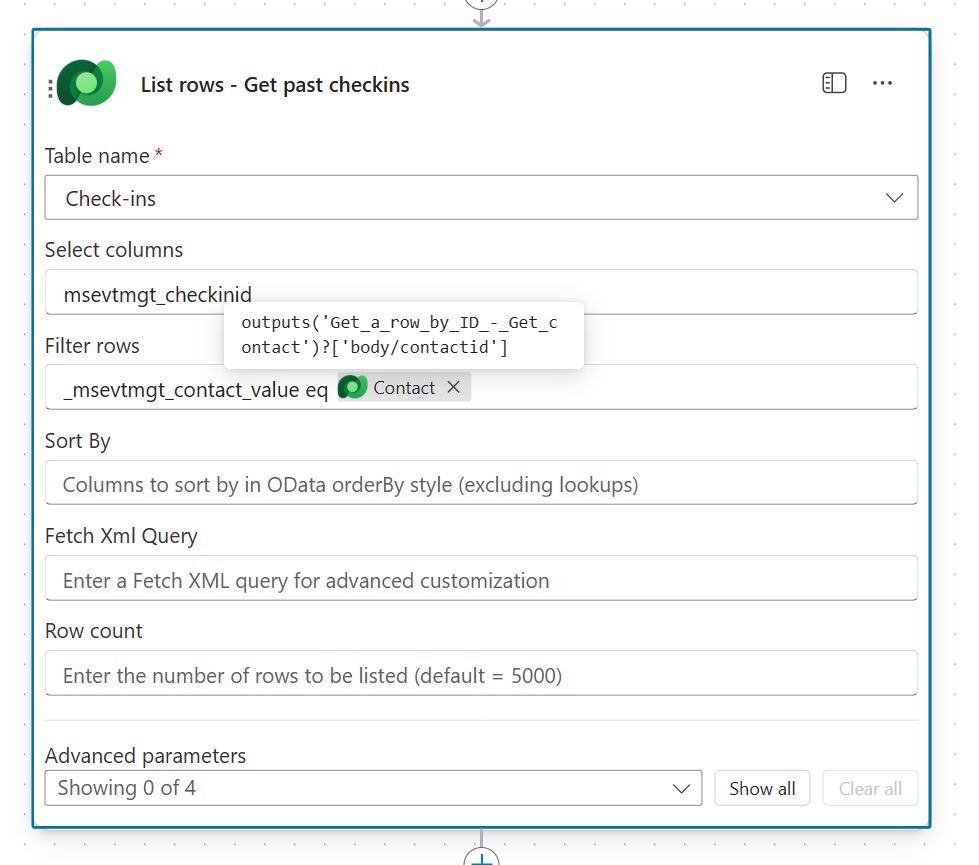
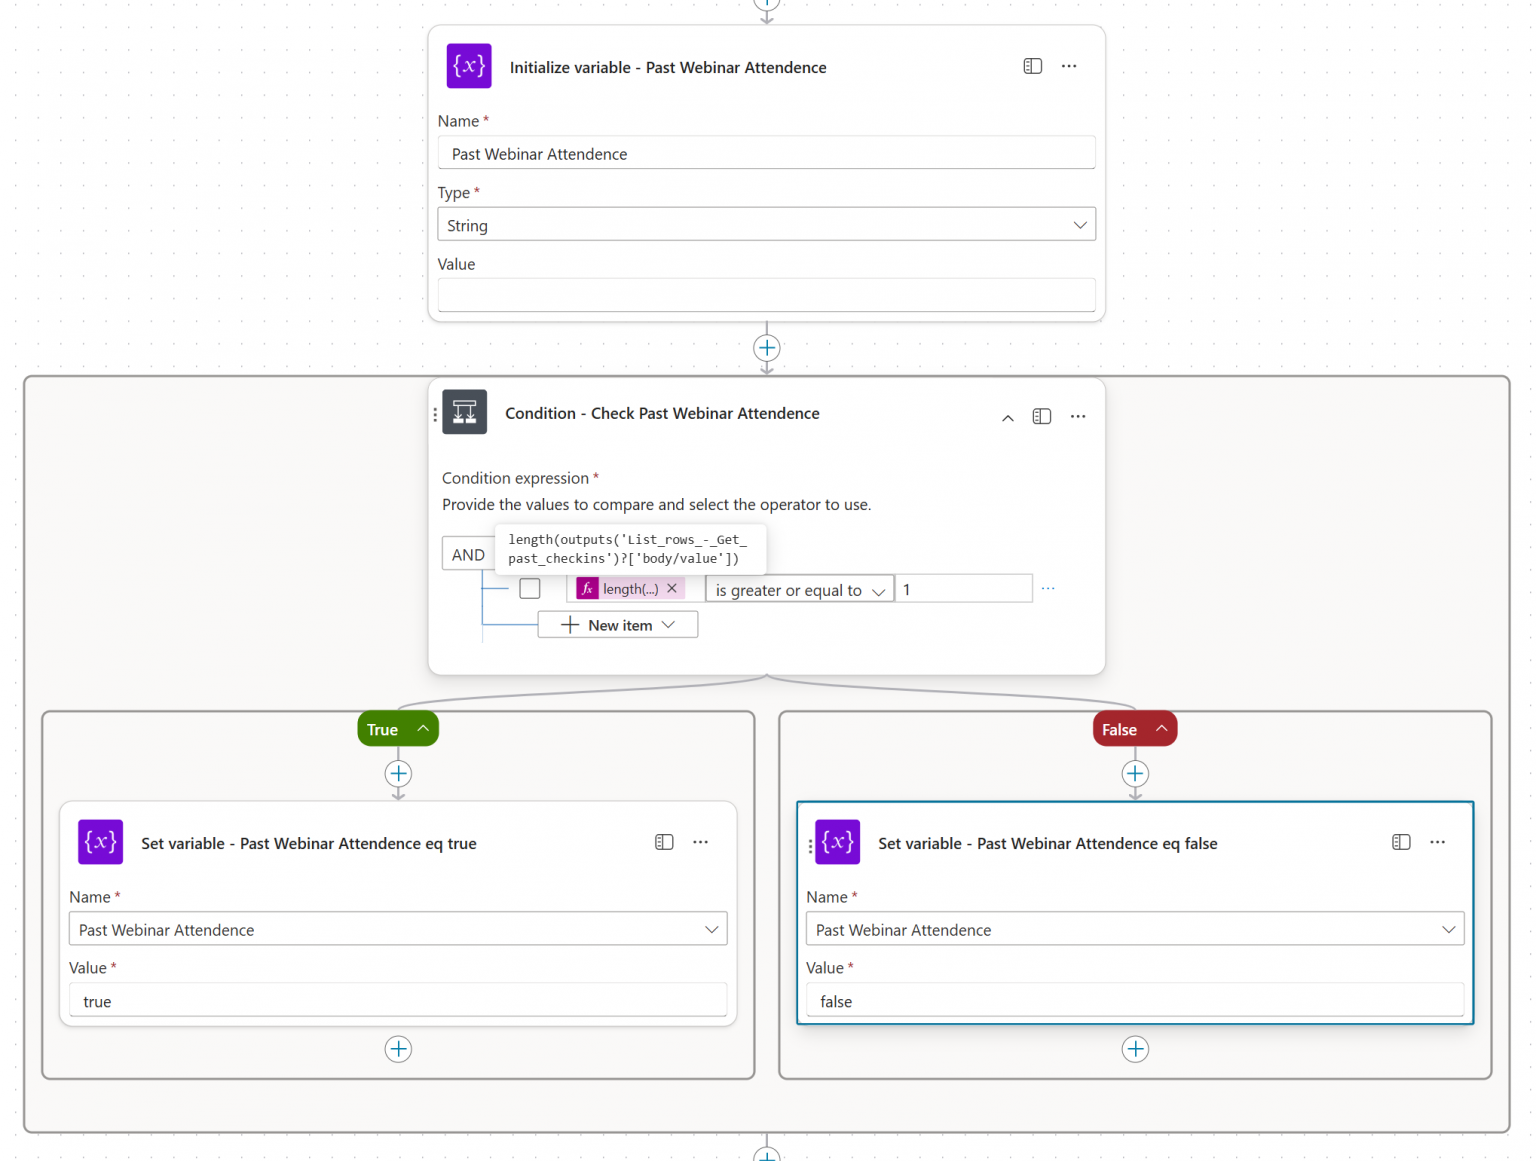
- Store result in a boolean variable → true if they attended past events, false otherwise.
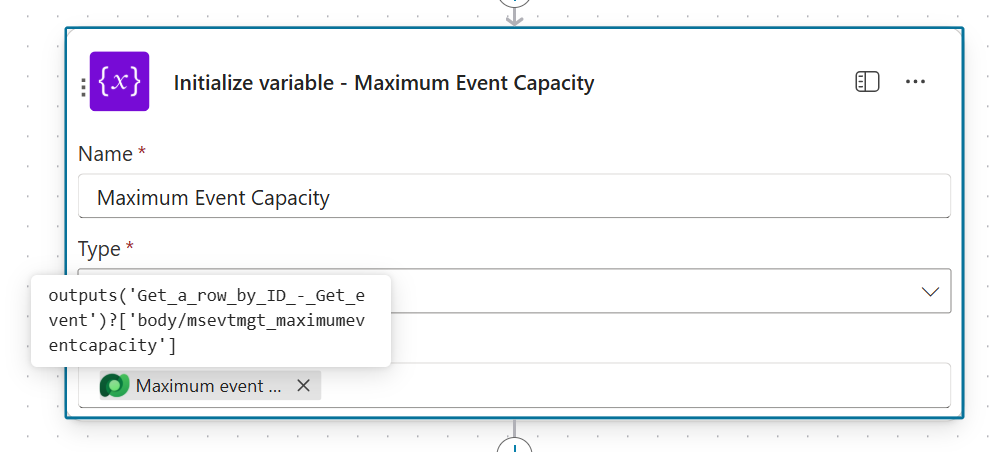
3. Prepare variables
- Initialize integer variable for Maximum Event Capacity → we’ll increment this later when a registration is approved.
4. Add the multistage approval
Insert the action “Run a multistage approval” and configure three steps: 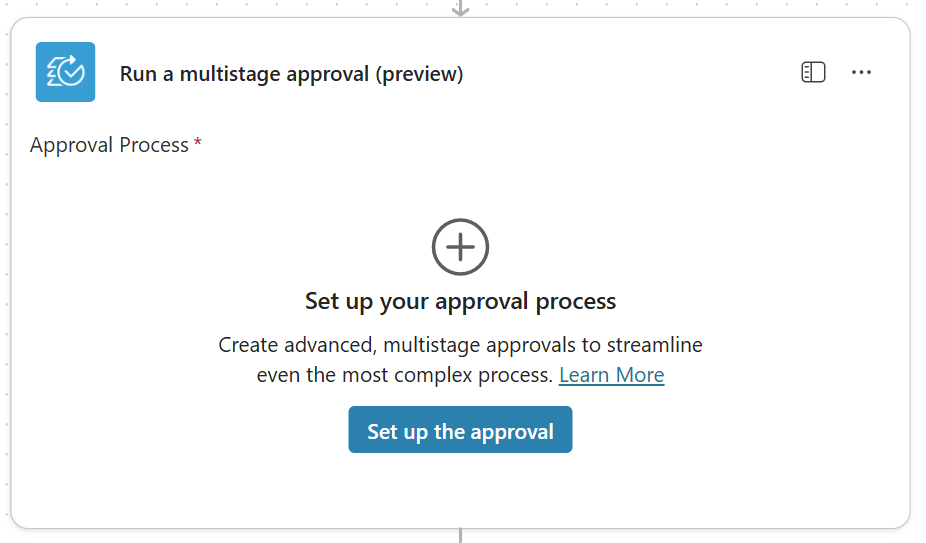 AI stage
- Add a prompt (with dynamic values from Dataverse).
- You can even feed in documents (e.g., from SharePoint) for extra context.
- Use sample data to test your prompt and see the AI’s reasoning.
- Define outcomes for Approved, Rejected, or Failed.
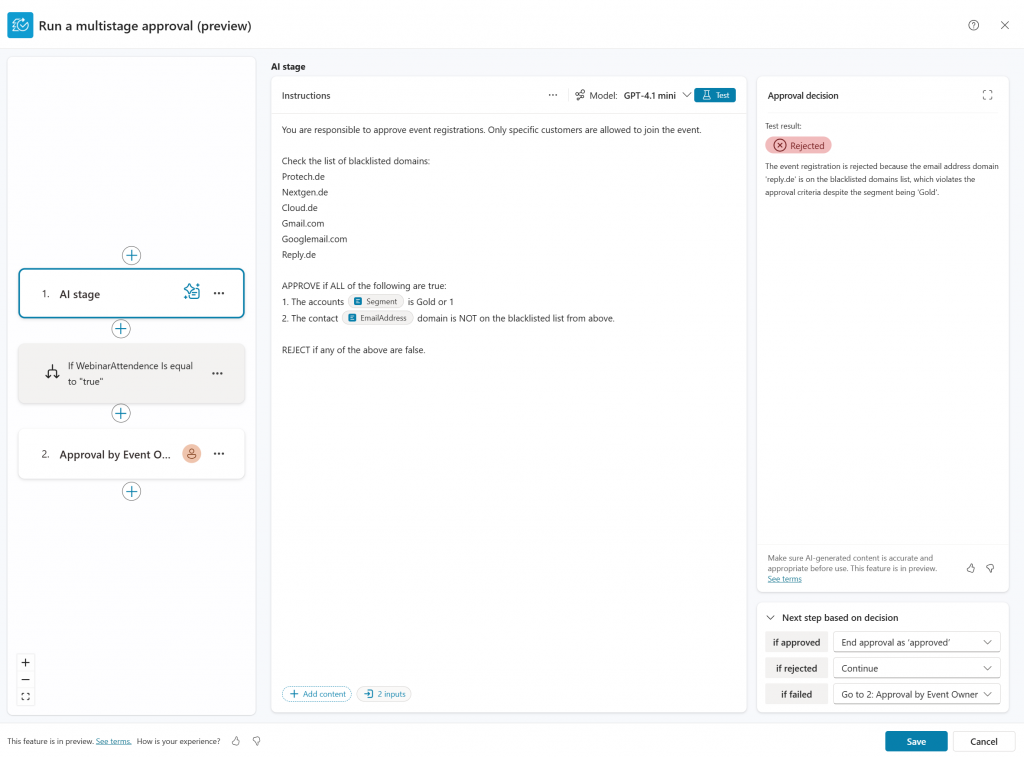
Condition stage
- Check
WebinarAttendance→ whether the contact has attended past events.
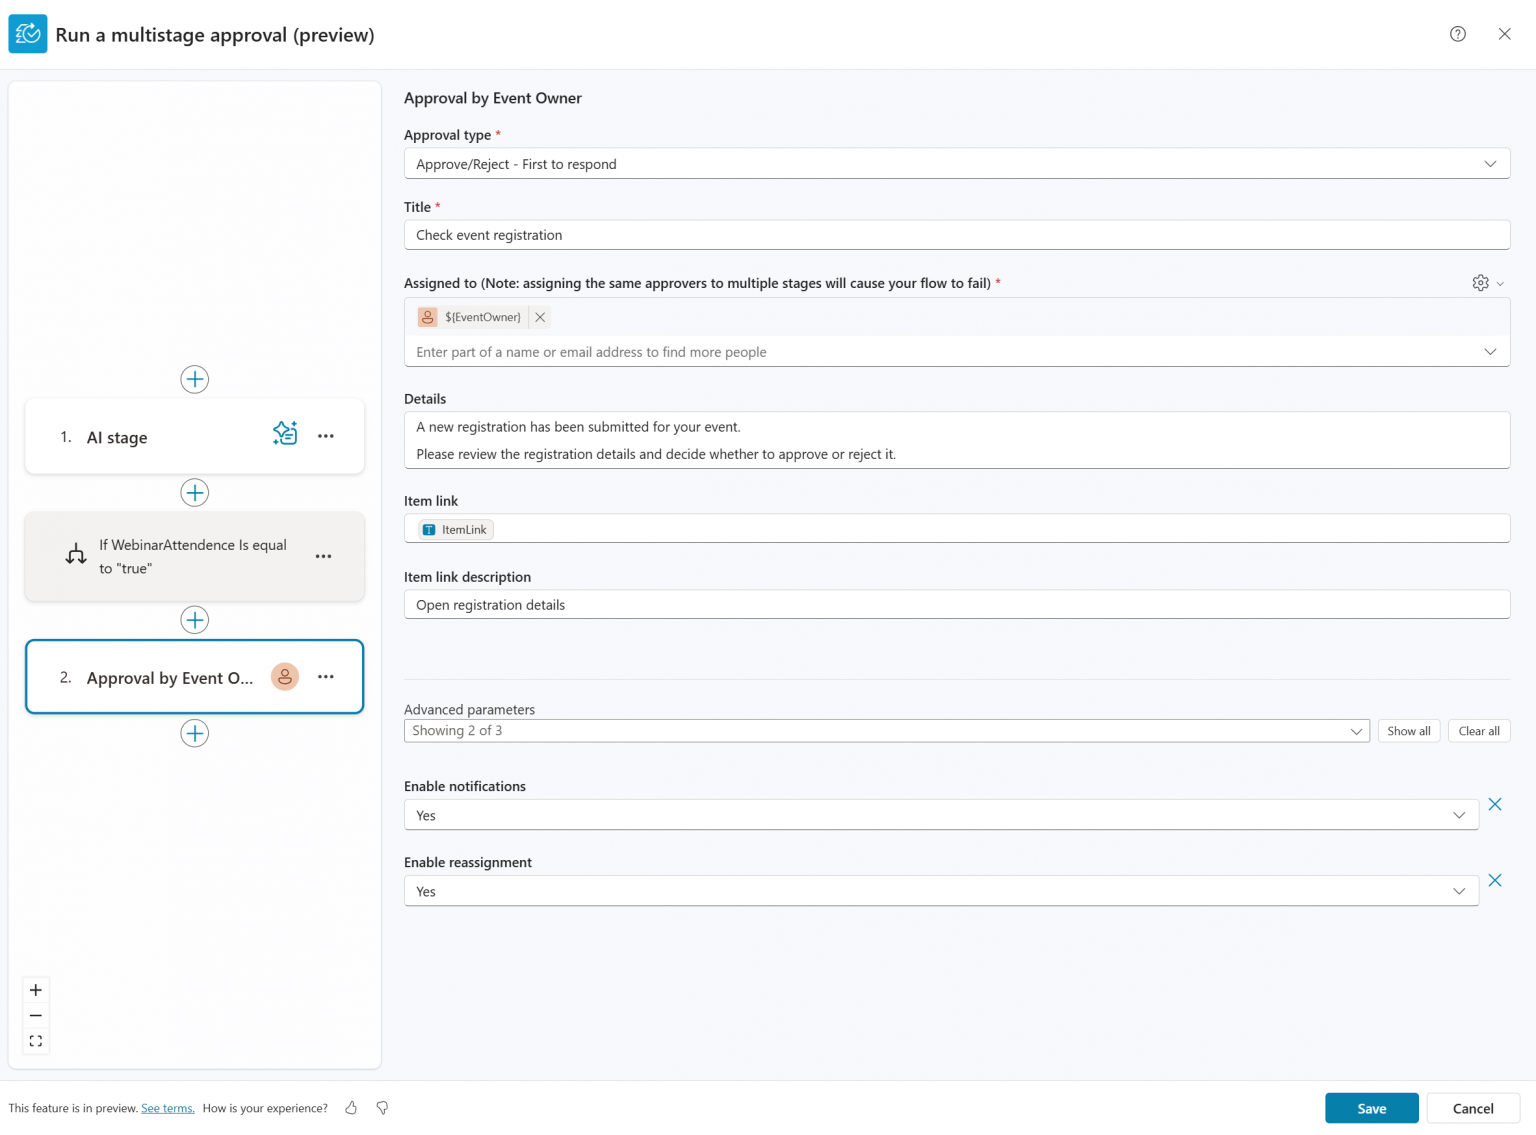
Human in the loop (Event Owner)
Fill in:
- Approval type
- Title
- Assigned to → dynamic input = Event Owner
- (Optional) add details, item link, and description
Save and close the multistage approval window.
5. Map dynamic inputs
In the approval action, you’ll now see the fields for dynamic inputs. Fill them with data from your event, contact, and account:
In my case that’s:
- Segment:
outputs(‘Get_a_row_by_ID_-_Get_contact’)?[‘body/accountid/pk_segment_code’] - EmailAddress:
outputs(‘Get_a_row_by_ID_-_Get_contact’)?[‘body/emailaddress1’] - EventOwner:
outputs(‘Get_a_row_by_ID_-_Get_event’)?[‘body/owninguser/domainname’] - ItemLink:
https://orgd2c266c8.crm4.dynamics.com/main.aspx?appid=2c5e66c7-f38b-f011-b4cc-6045bd9979f4&pagetype=entityrecord&etn=msevtmgt_eventregistration&id=triggerOutputs()?[‘body/msevtmgt_eventregistrationid’](Use an environment variable in real scenarios — this is just simplified for the demo.) - WebinarAttendence:
variables(‘Past Webinar Attendence’)
In the last step we need to add the condition based on the approval outcome.
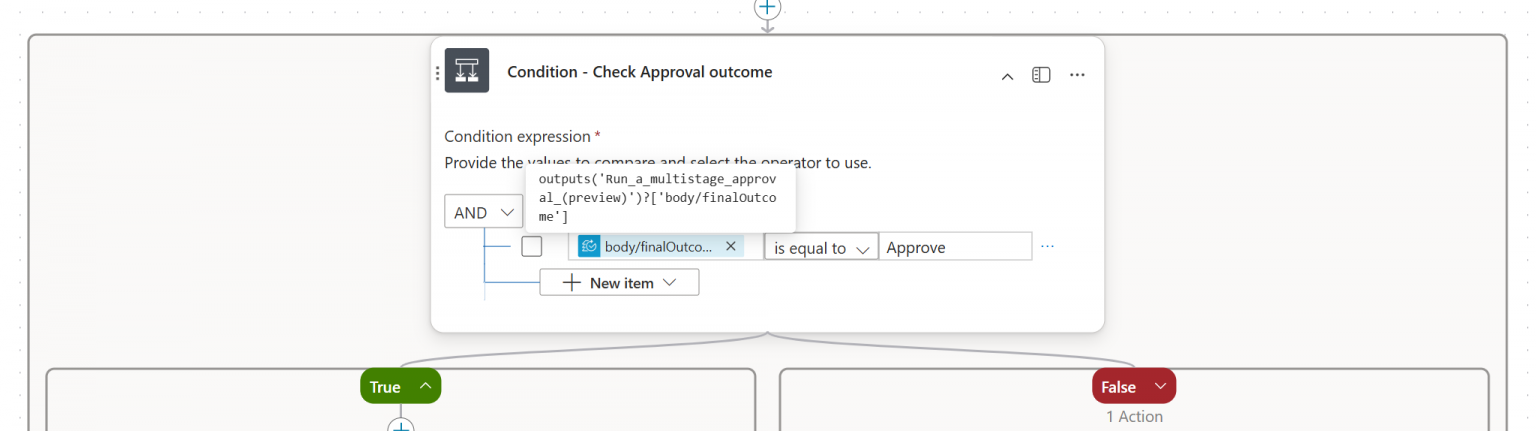
When the final outcome of the approval is “Approve”, we will increment the Maximum event capacity variable with 1 and update the field on the event accordingly.  Then we update the status reason of the event registration to “Registered”.
 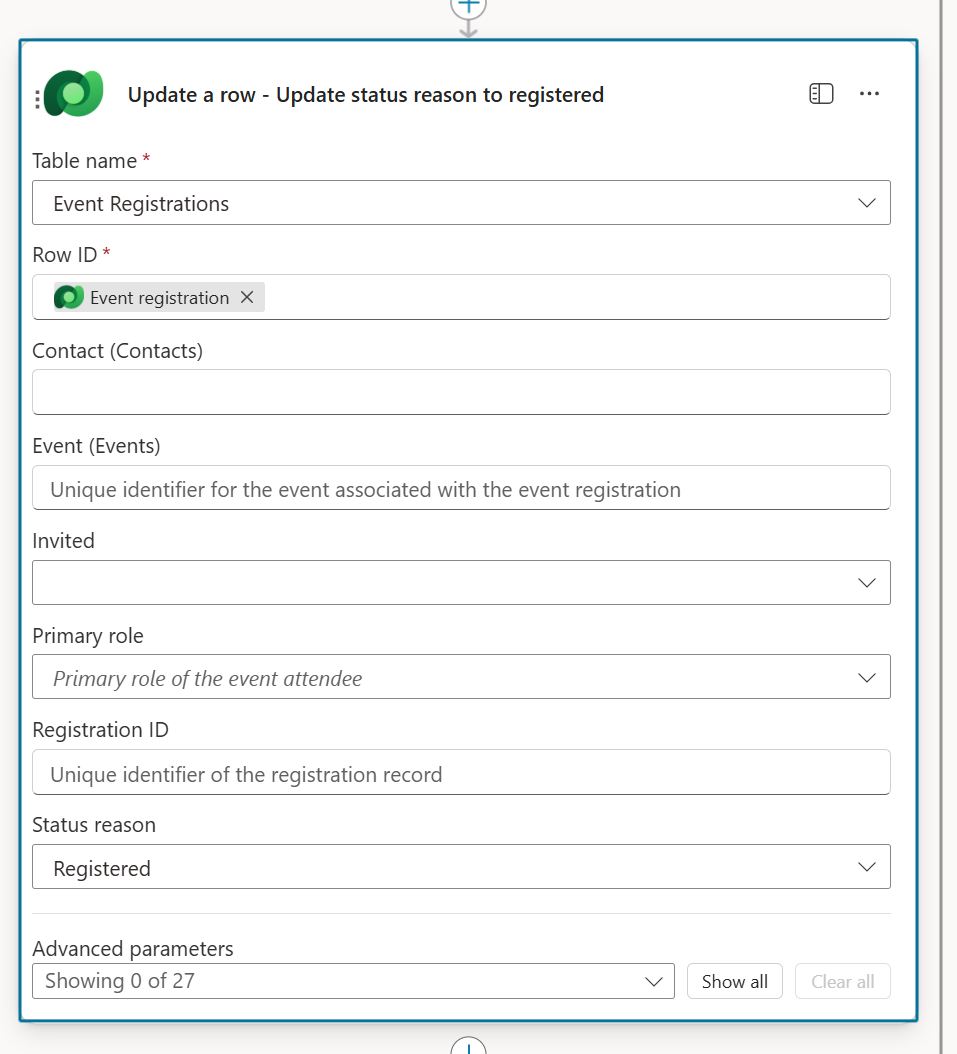 If the approval is rejected, we update the status reason of the event registration to “rejected” and the status to “inactive” (our new status reason we have added in the beginning).
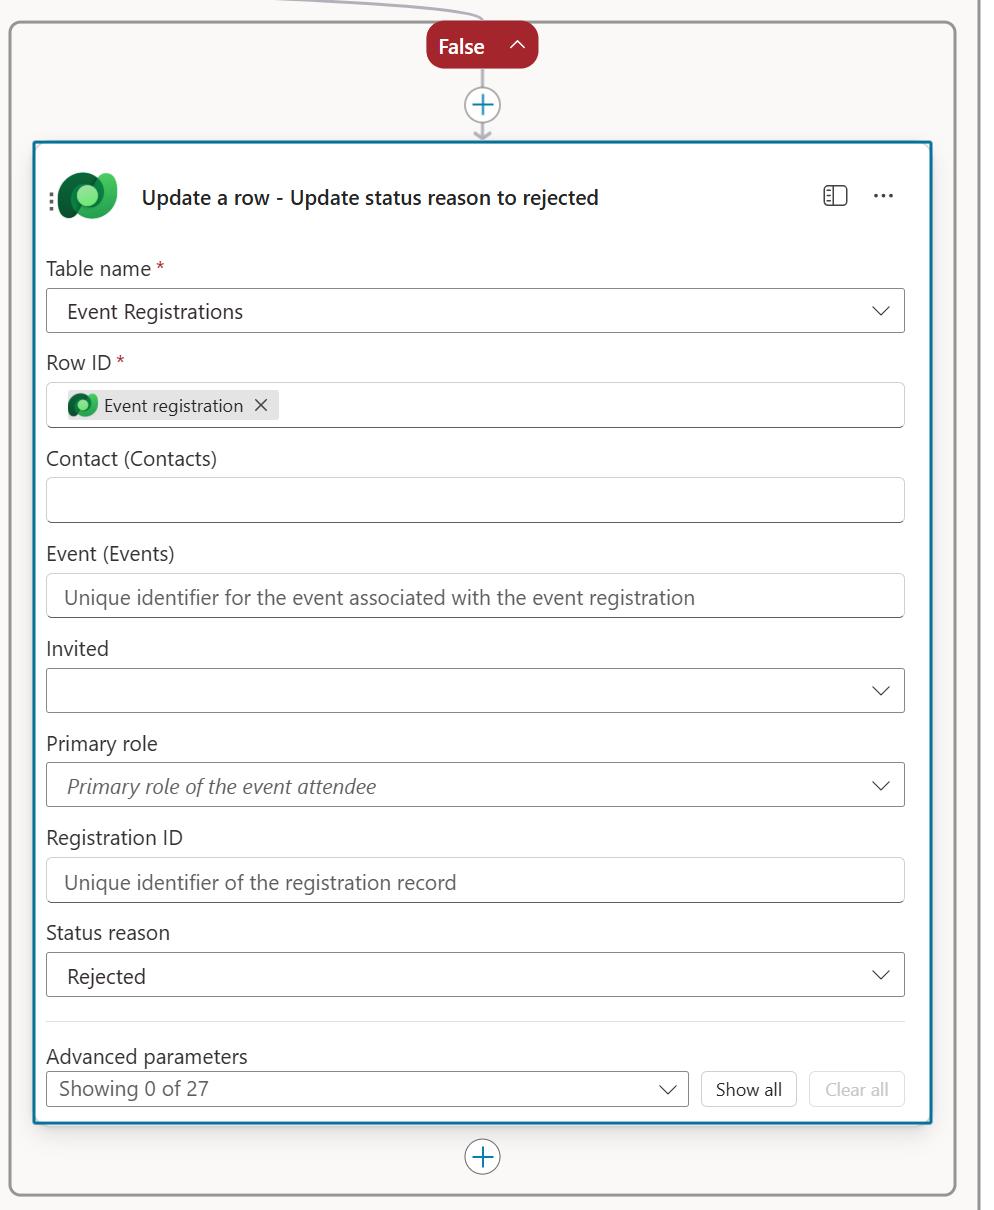
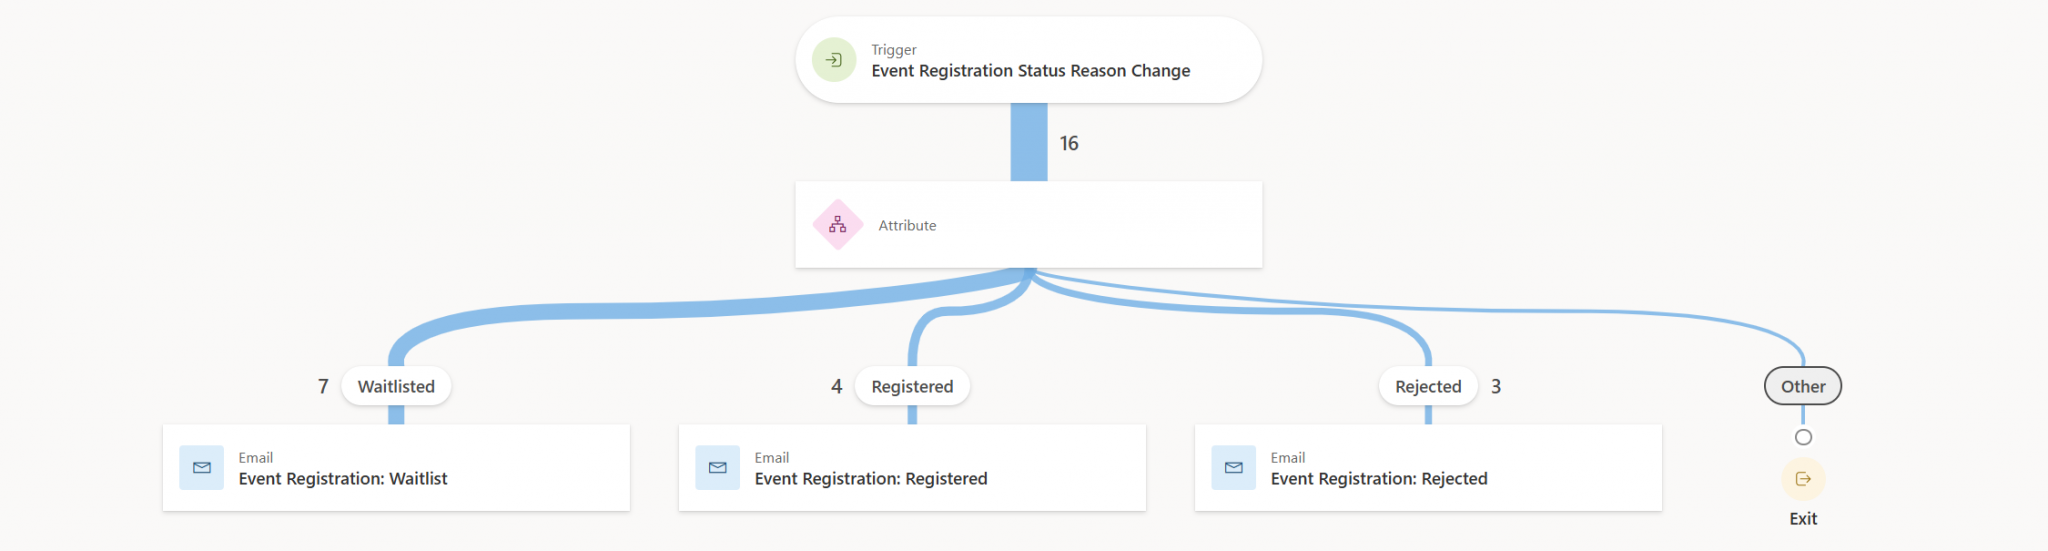
Handle the Communication Journey
I won’t go into too much detail about the journey that sends the different confirmation emails — for example:
- “You are on the waitlist”
- “You are registered”
- “We have to reject your registration, unfortunately”
If you want a great deep dive into that setup, I highly recommend Amey Holden’s article about that.
For this use case, I suggest going with Option 1.
Summary and Additions
Phew, this turned into quite a long article! I hope you were able to follow along step by step.
A quick note from my side: I did run into some issues with the AI stage in the approval process. Every now and then I received a “Bad Gateway” error. I haven’t figured out the exact reason yet. my guess is that it’s related to the preview status. If you’ve experienced the same and know more, please share your insights in the comments.
Don’t Forget Cancellations
One last thing to consider: what happens if someone cancels their registration after they’ve already been approved?
In that case, you’ll need an additional flow that:
- Detects when a contact cancels their event registration.
- Updates the maximum event capacity (increases the available slots by one).
- Ensures the next person registering is automatically added to the waitlist again.
More on Multistage Approvals
The great thing about multistage approvals is that you can add as many steps as you need. Think about extra checks for compliance, partner involvement, or internal review.
And if you’d like to see more about using AI in multistage approvals, I highly recommend watching Reza Dorrani’s video.
And that’s it! With these steps, you now have a structured approval process for event registrations using Agent Flows, one that gives you control, reduces confusion, and helps you deliver a smooth experience for your attendees.
Do you have questions, ideas or remarks? Feel free to get in touch.


